Accepting Linked Contract Patients
Tip: You can press Ctrl-F on your keyboard to search this topic.
New Linked Contract Patient cases are presented to Agencies from an authorizing Payer as Placements. An Agency is free to review the Patient’s case before ultimately deciding whether to accept or reject it. If an Agency accepts a case, all Patient information stored on the Payer’s Professional system transfers to the Enterprise system. The following section covers the review and acceptance of new Linked Contract Patients as well as all correspondence between an Agency and the authorizing Payer for any Linked Contract Patients.
Linked Communication
The Link Communication tab in the Home Module facilitates communication between an Agency and all Payers (Linked Contracts). This is where any data shared between the Professional and Enterprise systems is stored for review. In the Home page, Pending Placements and Notes (described under the following image) are seen.

Linked Communication Tab
|
Sections |
Description |
|
Pending Placements |
New Patient cases are presented to Providers from an authorizing Payer as “Placements”. Agencies are free to review the Patient’s case before deciding whether to accept or reject it. |
|
Notes |
All miscellaneous communications between an Agency and the Payer pertaining to Linked Contract Patient cases. |
Use the Office(s) and Coordinator fields to sort information under the Home tab.
Pending Placements
The Pending Placements section contains new Linked Contract Patient cases sent to an Agency from Linked Payers (as illustrated in the following image). The table under the image describes the information seen per line item.
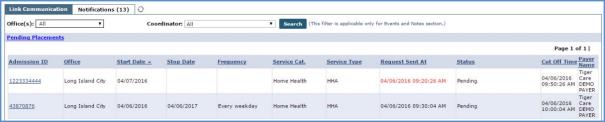
All Pending Placements
|
Sections |
Description |
|---|---|
|
Admission ID |
Patient’s Admission ID |
|
Office |
The Office within the Agency where a Patient is assigned. |
|
Start/Stop Dates |
Specifies the case’s start and stop dates. |
|
Frequency |
Specifies the frequency of service to provide for the Patient. |
|
Service Category |
Indicates the service category such as Home Health or Non-Home Health. |
|
Service Type |
Indicates the type of service required by the Patient. |
|
Request Sent At |
The time the Payer sent the Placement. |
|
Status |
Indicates the Status of the case (whether it has been accepted or not). |
|
Cut Off Time |
Indicates the date and time when the system will automatically remove the Pending Placement from the queue.
The value in the Request Sent At column is highlighted in red text when a Placement is nearing Cut Off Time; signifying immediate action is required.
Case nearing Cut Off Time |
|
Payer Name |
Indicates the Payer sending the Placement. |

Accepting a Pending Placement
Complete the following steps to accept or deny a Pending Placement.
|
Step |
Action |
|---|---|
|
1 |
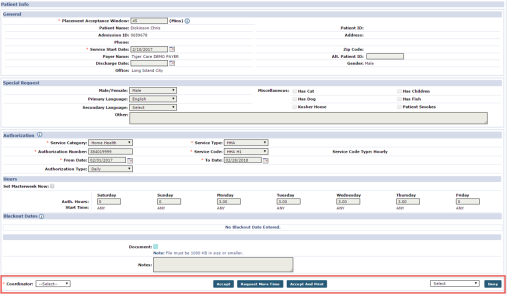
From the Pending Placements queue, click on the Placement Admission ID (hyperlink).
Placement’s Admission ID |
|
2 |
The Patient Info page opens to display Patient information such as General, Demographics, Special Requests and Authorizations. Review the details and scroll to the bottom to proceed.
Patient Info Page |
|
3 |
There are several Placement options to include: Accept, Request More Time (from the Payer to further review the case), Accept and Print, and Deny (to reject the Placement).
Accept, Request More Time, or Deny Placement
|
|
4 |
Once a Placement is Accepted or Denied, it is cleared from the Pending Placement section. |


Notes
The Notes section contains all open correspondence between an Agency and Payers. Notes may include information such as Caregiver observations, Patient requests, or any other information pertaining to the Patient’s case.
Refer to the Communications (Linked Contracts) category for complete details and instructions on using the Notes feature throughout the system.